
Overview
Today’s goal is to learn the complete workflow for using the Gund Gallery Show Builder and the wall-designer-starter Python tool.
By the end of class, you should understand:
- how to log in to the web platform,
- how projects and files work,
- how to choose candidate artworks for walls,
- how to change scoring settings,
- how to visualize a show,
- how to download project files,
- how to run the Python wall designer on your own machine,
- how to upload the resulting show file back into the web system,
- and how to repeat that process wall by wall.
This is not just practice in clicking through a website. The point is to understand the architecture of the system and how the files move through the workflow.
System architecture:
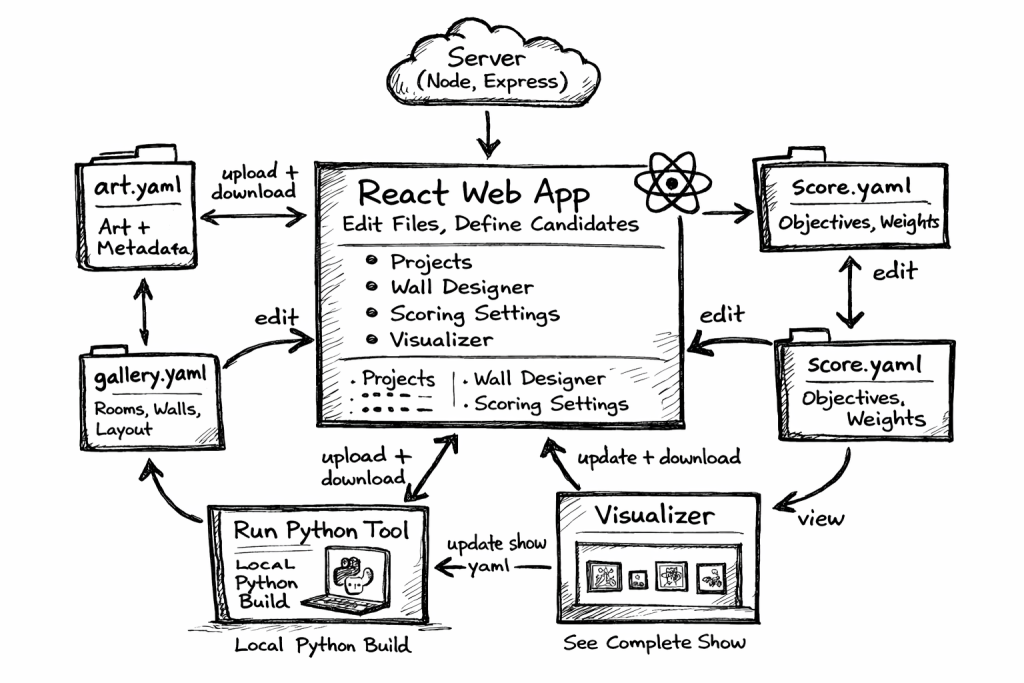
Part 1: Using the Gund Gallery Show Builder
Step 1: Open the Web App and Log In
Open the React application in your browser:
Log in using:
- Username: your assigned username
- Password: your student ID
Once you are logged in, you should see the main navigation for the system.
Step 2: Understand the Main Idea of the Platform
The Gund Gallery Show Builder is organized around projects.
A project is a working environment that contains a coordinated set of YAML files. Each project represents one evolving show-building effort.
Each project has four core file types:
- Art file
This contains the list of artworks and their metadata. - Gallery file
This contains the gallery structure, including rooms and walls. - Show file
This contains the current show design information, including wall candidate sets and placements. - Scoring file
This contains the scoring rules used to evaluate wall or show designs.
A project may contain multiple versions of each file type, but only one of each type is active at a time.
That means each project has:
- one active art file,
- one active gallery file,
- one active show file,
- one active scoring file.
The rest of the application uses those active files.
This is important: if something looks wrong, one of the first things to check is which files are active.
Step 3: Go to the Projects Page and Create a New Project
Open the Projects page.
Create a new project.
When you create a project, the system creates a new working set of files for that project. In particular:
- it creates or copies the art file,
- it creates or copies the gallery file,
- it creates or copies the scoring file,
- and it generates a new show file from the gallery structure.
The show file begins in a clean state:
- all walls are represented,
- no candidate artworks are selected yet,
- no artworks are placed yet.
This is the correct blank starting point for building a show.
Step 4: Inspect the Project Files
Still on the Projects page, look carefully at the file structure for your project.
Make sure you understand:
- what the four file types are,
- which file is active for each type,
- that there can be multiple files of each type,
- that you can switch which one is active.
Also notice that the project manager allows you to:
- create files,
- clone files,
- upload files,
- download files,
- and switch the active file.
These features exist because this system is designed for experimentation.
You are expected to make variations.
Step 5: Understand Cloning, Downloading, Uploading, and Switching Files
Cloning
Cloning lets you make a new file starting from an existing one. This is useful when you want to preserve one version while experimenting with another.
For example, you might:
- clone a scoring file before changing its weights,
- clone a show file before trying a new design direction.
Downloading
Downloading lets you move the active YAML files from the web platform to your computer.
This is how you get files to use with the Python wall designer.
Uploading
Uploading lets you bring an updated YAML file back into the project.
This is how you return a show file produced by the Python tool back into the web application.
Switching Active Files
The application only uses the currently active file of each type. If you upload or clone a new file, you may need to set it as active before the rest of the system will use it.
Step 6: View the Gallery Parameters
Open the Gallery page.
Spend a few minutes looking at the gallery structure.
You should be able to see or infer:
- the rooms,
- the walls,
- and the basic structure of the exhibition space.
This matters because wall design is not abstract. It happens inside a specific space.
The gallery file defines the spatial structure that the show file must match.
Step 7: Use the Wall Design Page
Open the Wall Design page.
At the top of the page, you should see the active:
- show file
- art file
This page lets you choose a wall and define which artworks are candidates for that wall.
What this page does
This page does not directly lay out artworks on the wall.
Instead, it updates the show file so that the selected wall has a candidate set of artworks.
That candidate set is later used by the Python wall-designer program.
What to do
- Select a wall from the wall dropdown.
- Use the filter controls to search by:
- search text,
- period,
- theme,
- artist.
- Check artworks to include them as candidates for that wall.
- Uncheck artworks to remove them from the candidate list.
- Notice the placement status shown for each artwork.
- Try the helper buttons such as:
- Add All Unused
- Clear Wall
As you do this, remember: you are editing the show file, not generating the final wall arrangement yet.
Step 8: Change the Scoring Settings
Open the Scoring Settings page.
At the top, you should see the active scoring file.
This page allows you to edit the values in the scoring file.
The scoring file controls how the Python generator evaluates possible wall designs.
This means:
- changing scoring values does not directly place artworks,
- but it changes what kinds of solutions the generator will prefer.
What to do
- Inspect the current scoring settings.
- Change a few values.
- Save the file.
- Think about what effect those changes might have on the generated wall.
Step 9: Upload a Completed Show File and Visualize It
Please download this file to your computer: https://cs.jimskon.com/wp-content/uploads/2026/04/show-demo.txt
Rename it to show-demo.yaml. (WordPress won’t let you download yaml files!)
What to do
- Obtain the completed show file.
- Go to the Projects page.
- Upload the
show-demo.yamlinto your project. - Set it as the active show file if necessary.
- Open the Visualizer page.
- View the resulting show.
What to notice
As you visualize the show, pay attention to the connection between:
- the show file,
- the gallery structure,
- the artwork data,
- and the visual output.
The visualizer is how you inspect the result of a show configuration.
Part 2: Using the Python Wall Designer
Now we move from the web platform to the Python tool.
The web platform helps you define:
- the candidate artworks,
- the gallery structure,
- the current show,
- and the scoring rules.
The Python tool uses those files to generate wall designs.
The workflow is:
- choose candidate artworks for a wall in the web app,
- adjust scoring if needed,
- download the files,
- run the Python program locally,
- upload the resulting show file,
- visualize the result,
- repeat until you like the wall,
- then move on to the next wall.
Step 10: Clone the Python Starter Repository
On your computer, open a terminal.
Clone the repository:
git clone https://github.com/Kenyon-CS/wall-designer-starter.git
Then move into the project directory:
cd wall-designer-starter
Step 11: Set Up the Python Environment
You can do this on either Mac or Windows.
On a Mac
Open Terminal and run:
python3 --version
Make sure Python 3 is installed.
Then create a virtual environment:
python3 -m venv venv
Activate it:
source venv/bin/activate
Then install dependencies:
pip install -r requirements.txt
On Windows
Open PowerShell or Command Prompt and run:
py --version
or
python --version
Then create a virtual environment:
py -m venv venv
Activate it in PowerShell:
.\venv\Scripts\Activate.ps1
If you are using Command Prompt, activate it with:
venv\Scripts\activate.bat
Then install dependencies:
pip install -r requirements.txt
Step 12: Confirm That the Starter Program Runs
Before using your own files, make sure the starter program runs correctly.
Follow the repository instructions and run the starter exactly as described there.
The main point here is to verify:
- Python is working,
- dependencies are installed,
- the program runs without crashing.
If it does not run at this stage, stop and fix that before going further.
Step 13: Download the Active Project Files
Return to the web platform.
In your project, make sure the correct files are active:
- art file
- gallery file
- show file
- scoring file
Then download those files to your computer.
You need the complete active working set.
These files are the inputs to the Python tool.
Step 14: Place the Downloaded Files into the Python Workflow
Move or copy the downloaded files into the location expected by the starter project.
You should understand which files the Python program is using:
- the art file provides the artwork data,
- the gallery file provides the wall and room structure,
- the show file provides the current candidate wall setup,
- the scoring file provides the evaluation logic.
This is the core architectural relationship.
Step 15: Run the Python Wall Designer
Run the starter program using the downloaded files.
The exact command may depend on the starter repository structure and we will walk through it in class, but the important idea is this:
- the Python program reads the YAML files,
- it generates or updates a wall design,
- it writes an updated show file.
When you run it, you are using the files you configured in the web system as algorithm input.
Step 16: Upload the Resulting Show File Back Into the Project
Once the Python tool has produced an updated show file:
- go back to the web platform,
- open the Projects page,
- upload the updated show file,
- make it active if necessary.
Now the web system can use that show file.
Step 17: Visualize the Result
Open the Visualizer page.
Inspect the result carefully.
Ask yourself:
- Does the wall look reasonable?
- Are the chosen works appropriate together?
- Does the result seem balanced?
- Should I change the candidate set?
- Should I change the scoring?
- Should I rerun the generator?
This is the beginning of the iterative design loop.
Step 18: Repeat the Process
This workflow is not one-and-done.
Repeat the cycle:
- choose a wall,
- adjust candidate artworks,
- adjust scoring if desired,
- download the files,
- run the Python tool,
- upload the new show file,
- visualize,
- revise.
Do this several times.
Once you are satisfied with one wall, move on to the next wall.
What You Should Understand by the End of Class
By the end of today’s in-class activity, you should be able to explain all of the following clearly:
- how to access the web platform,
- how to log in,
- what a project is,
- what the four core file types are,
- what active files are,
- how to clone, upload, and download files,
- how the scoring file affects algorithm behavior,
- how the Wall Design page updates the show file,
- how the Visualizer displays a show,
- how to clone and set up the wall-designer-starter repository,
- how to run the Python workflow on your Mac or Windows machine,
- and how the full loop of configuration, generation, upload, and visualization works.
Important Ideas to Keep in Mind
- The system is built around files, not hidden magic.
- A valid workflow depends on keeping the active files straight.
- The show file is a working design state.
- The scoring file changes evaluation, not direct placement.
- The wall-design page defines candidates, not final layout.
- The Python tool consumes files and produces updated files.
- The visualizer helps you inspect the result of those choices.
- Good results usually require iteration.
What Comes Next
Today is about learning the workflow.
Next week, we will begin looking at the Python code itself and start modifying it.
That next step will make much more sense once you understand:
- where the input files come from,
- what the output file is,
- how the web application manages the project,
- and how the whole architecture fits together.