
Programming the MIC-1
Due: Feb. 15
Overview
mic1 is a Java-based simulator which implements the Mic-1 microarchitecture described in Chapter 4 of Andrew S. Tanenbaum, Structured Computer Organization. The Mic-1 has been microcoded to implement a simplified (interger only) version of the Java Virtual Machine, IJVM.
The purpose of this lab is to familiarize the student with coding at the machine instruction level environment, and observe the operation of the underlying processor.
The Mic-1 ISA Programming
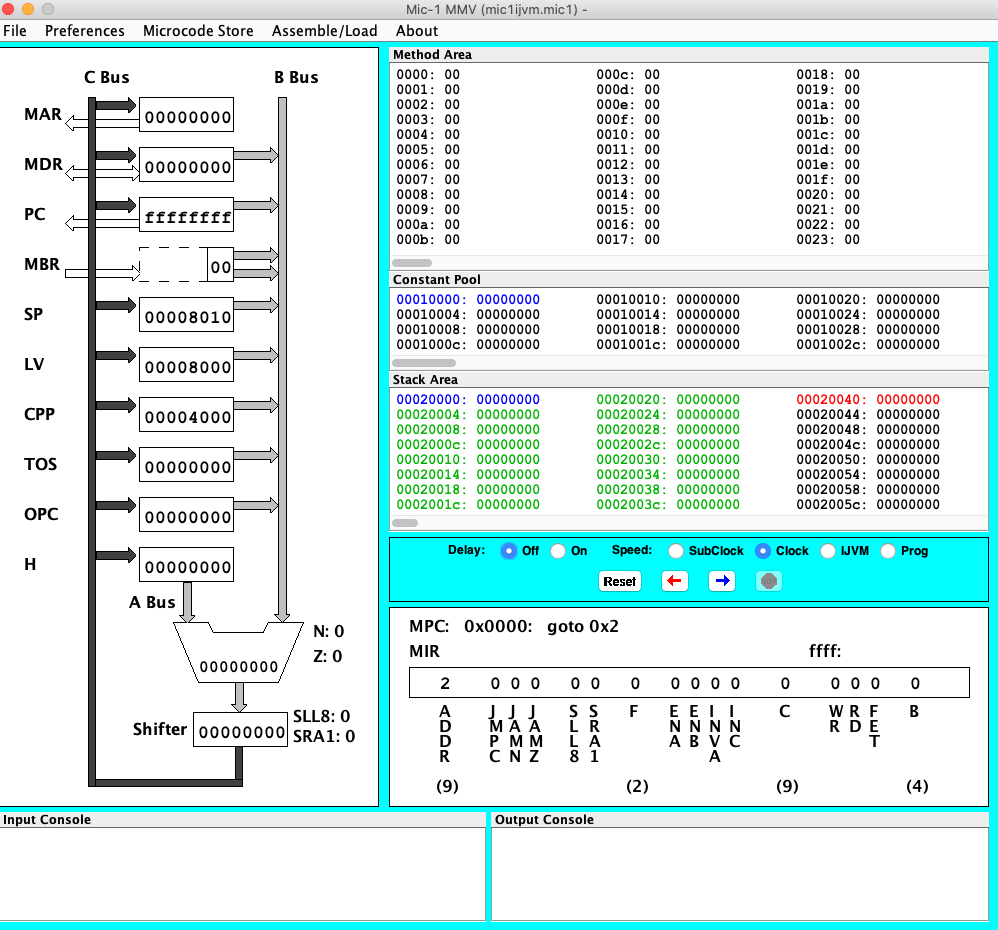
The Mic-1 is available here: https://www.cs.oberlin.edu/~rms/mic1/
You must have java installed on your computer.
The Mic-1 is a Stack based machine. This means that all operations are done on the stack. So, for example, in order to add two numbers in memory, and put the result back into memory we do the following:
// Add 4 and 6 and put the result in variable a
.var
a
.end-var

.main
         BIPUSH 4   // Push 4 on stack
         BIPUSH 6   // Push 6 on stack
         IADD           // Add the values
         ISTORE  a  // Store result in memory (variable a)
         HALT          // Stop
.end-mainCode language: PHP (php)
What this means is that a is a place in memory. We can use a symbol because the assembler will automatically set set aside a memory location, and substitute the letter a with the address. 4 and 6 are “immediate” operands, meaning the values are actually included in the instruction. Below we do everything in base 16 (Hexadecimal or Hex)
So, to start we will have a empty stack (assume the stack starts at memory location n, and the variable a is at memory location m.
Stack
| Address | Value |
|---|---|
| n | [empty] |
After we push 4 and 6 the stack looks like this:
| Address | Value |
|---|---|
| n | 0x6 |
| n-1 | 0x4 |
After the add we get (in Hex, 0xA = 10):
| Address | Value |
|---|---|
| n | A |
We then Store in a, and the stack is once again empty:
| Address | Value |
|---|---|
| n | [empty] |
variables
| Address | Value |
|---|---|
| m | 0xA |
What are the available instruction? Here they are:
| Mnemonic | Operands | Description |
|---|---|---|
| BIPUSH | byte | Push a byte onto stack |
| DUP | N/A | Copy top word on stack and push onto stack |
| ERR | N/A | Print an error message and halt the simulator |
| GOTO | label name | Unconditional jump |
| HALT | N/A | Halt the simulator |
| IADD | N/A | Pop two words from stack; push their sum |
| IAND | N/A | Pop two words from stack; push Boolean AND |
| IFEQ | label name | Pop word from stack and branch if it is zero |
| IFLT | label name | Pop word from stack and branch if it is less than zero |
| IF_ICMPEQ | label name | Pop two words from stack and branch if they are equal |
| IINC | variable name, byte | Add a constant value to a local variable |
| ILOAD | variable name | Push local variable onto stack |
| IN | N/A | Reads a character from the keyboard buffer and pushes it onto the stack. If no character is available, 0 is pushed |
| INVOKEVIRTUAL | method name | Invoke a method |
| IOR | N/A | Pop two words from stack; push Boolean OR |
| IRETURN | N/A | Return from method with integer value |
| ISTORE | variable name | Pop word from stack and store in local variable |
| ISUB | N/A | Pop two words from stack; push their difference |
| LDC_W | constant name | Push constant from constant pool onto stack |
| NOP | N/A | Do nothing |
| OUT | N/A | Pop word off stack and print it to standard out |
| POP | N/A | Delete word from top of stack |
| SWAP | N/A | Swap the two top words on the stack |
| WIDE | N/A | Prefix instruction; next instruction has a 16-bit index |
For our purposes today we will need to use two types of files:
| Suffix | Meaning |
|---|---|
| .jas | IJVM assembly source file. IJVM is the ISA (instruction set architecture) that we are implementing on the Mic-1. This is at the same level as 6811 assembly code. Sample instructions are BIPUSH, DUP, IADD, etc. |
| .ijvm | IJVM binary file. When you run the .jas program through the ijvmasm assembler, you get an .ijvm file. This is the “executable” for the Mic-1 simulator |
Step 1 – Run simple programs on Mic-1
Take the code above and save as add.jas.
Setup and test the Mic-1 system:
- Download the attached
Mic-1simulator environment: broken link - Set up to run based on your OS type (see readme file in download)
- You will need the
Javaruntime environment on your computer to runMic-1 - Run the program in the bin directory (
Mic1MMV_hr.jarorMic1MMV_lr.jarfor high and low resolution screens)
- You will need the
- In the file menu to to “Assemble/Load JAS file…” Pick the add.jas. Hit the button to load (if the assembly is without errors)
- Select “IJVM” in the blue box. This allows you to step through the program.
- Hit the Blue arrow, watching the program step, until it halts.
- You will notice things happening, but you will not see the result. Unfortunately this machine does not let you look in memory.
Step 2 – Run more programs on Mic-1
The Machine has two important instructions “IN” and “OUT”. These accept keyboard input (IN) and print ASCII characters to an output window in the simulator (OUT). IN reads a keypress and pushes its ASCII value on the stack (or zero, if no key was pressed). OUT pops a word from the stack and displays it as an ASCII character.
Here is a very simple program:
// this program displays all the printable ASCII values 32..126
.constant
one     1
start   32
stop    126
.end-constant

.main
         LDC_W start
next:   DUP
         OUT             // output the current character
         DUP
         LDC_W stop
         ISUB
         IFEQ done       // exit if we've reached the end
         LDC_W one
         IADD
         GOTO next       // increment and do the next one
done:   POP
         HALT
.end-mainCode language: PHP (php)
Save it, and try it as well. Explain what it does, and how it does it.
The next program simply echos whatever is put into the input out to the output. Review the program and explain in your lab write-up how it works.
//
//   echo.jas
//
//   Description
//     Sample assembly program that reads a key press and echoes the result to
//     standard output.
//
.main

L1:   IN           // request character input from memory
      DUP          // duplicate top of stack (inputed char) for comparing
      BIPUSH 0x0   // push 0x0 for comparison
      IF_ICMPEQ L2 // if no characters are available for input, loop
      OUT          // else, print character
      GOTO L1      // loop back to beginning of program


L2:   POP          // No key has been pushed, so clear the stack,
      GOTO L1      // and start over
.end-mainCode language: PHP (php)
Note that “.main”, and other directives starting with dots, are assembler directives. They do not add to the machine code, they merely give instructions to the assembler about what to do.
Try the program out – save to a file, load, and run.
Now for something a bit more complected:
// Reverse an input string
.main
.var
count
.end-var
   BIPUSH 0x0   // Clear counter
   ISTORE count //  by setting to zero
L1:   IN           // request character input from Console
   DUP          // duplicate top of stack (inputed char) for comparing
   BIPUSH 0x0   // push 0x0 for comparison
   IF_ICMPEQ L1 // if no characters are available for input, loop
   IINC count 0x1   // Incrememt input counter
   DUP          // Make another copy for next compare
   BIPUSH 0x21  // Push a "!" on stack
   IF_ICMPEQ L2 // If we have a "!", output the characters in reverse
   GOTO L1

L2:   ILOAD count   // See how  many left to print
   IFEQ DONE    // If zero, all done
   OUT          // Output the top of stack
   ILOAD count   // Get counter
   BIPUSH 0x1   // 1 to decrement
   ISUB         // decrement
   ISTORE count  // save updated count
   GOTO L2      // Print next character
DONE:   HALT

.end-mainCode language: PHP (php)
Try this program out. Get it running, and explain how it works. Notice that 0x21 is a “!”. This is used as the signal to stop. All the ASCII characters can be found here: http://www.asciitable.com/
Step 3 – Make your own
- Write a program to search for and count the number of occurrences of the letter “a” in a string typed in. Terminate the string with an “!” as before. Then print out the number as an ASCII character. (You can assume there will be less than 10 a’s.) How do we print out the answer? Look at the ASCII table. a 0 is a 0x30. Simply add 0x30 to your count.
- Modify the program from above so that on the first line is the letter to search for, and on the second is the string.
- Write a program to check a string to see if the parenthesis balance (again terminate with an “!”). How? Use the stack! Print out “yes” or “no” to tell if they balance.
- (Extra Credit). Make #1 above print out 2 digit answers for >10 matches.
To Turn In
- Answer all the questions from above.
- Turn in all source code.
- For each program you write, take a screen shot of the machine after it runs with the input and output showing.